DIY Witch Wreath
A few weeks ago, a friend sent me a picture of a wreath and asked if I could make it. The Burlap Witch Wreath looked fairly simple and let me tell you…

IT WAS!
The hardest part about this DIY Witch Wreath was finding the supplies which wasn’t very difficult since I order all my wreath supplies online. There are two websites that I order from, Trendy Tree and Mardi Gras Outlet, they are both great websites and ship very quickly. Between the two sites, they had everything I needed.
Supplies needed to make your Burlap Witch Wreath:
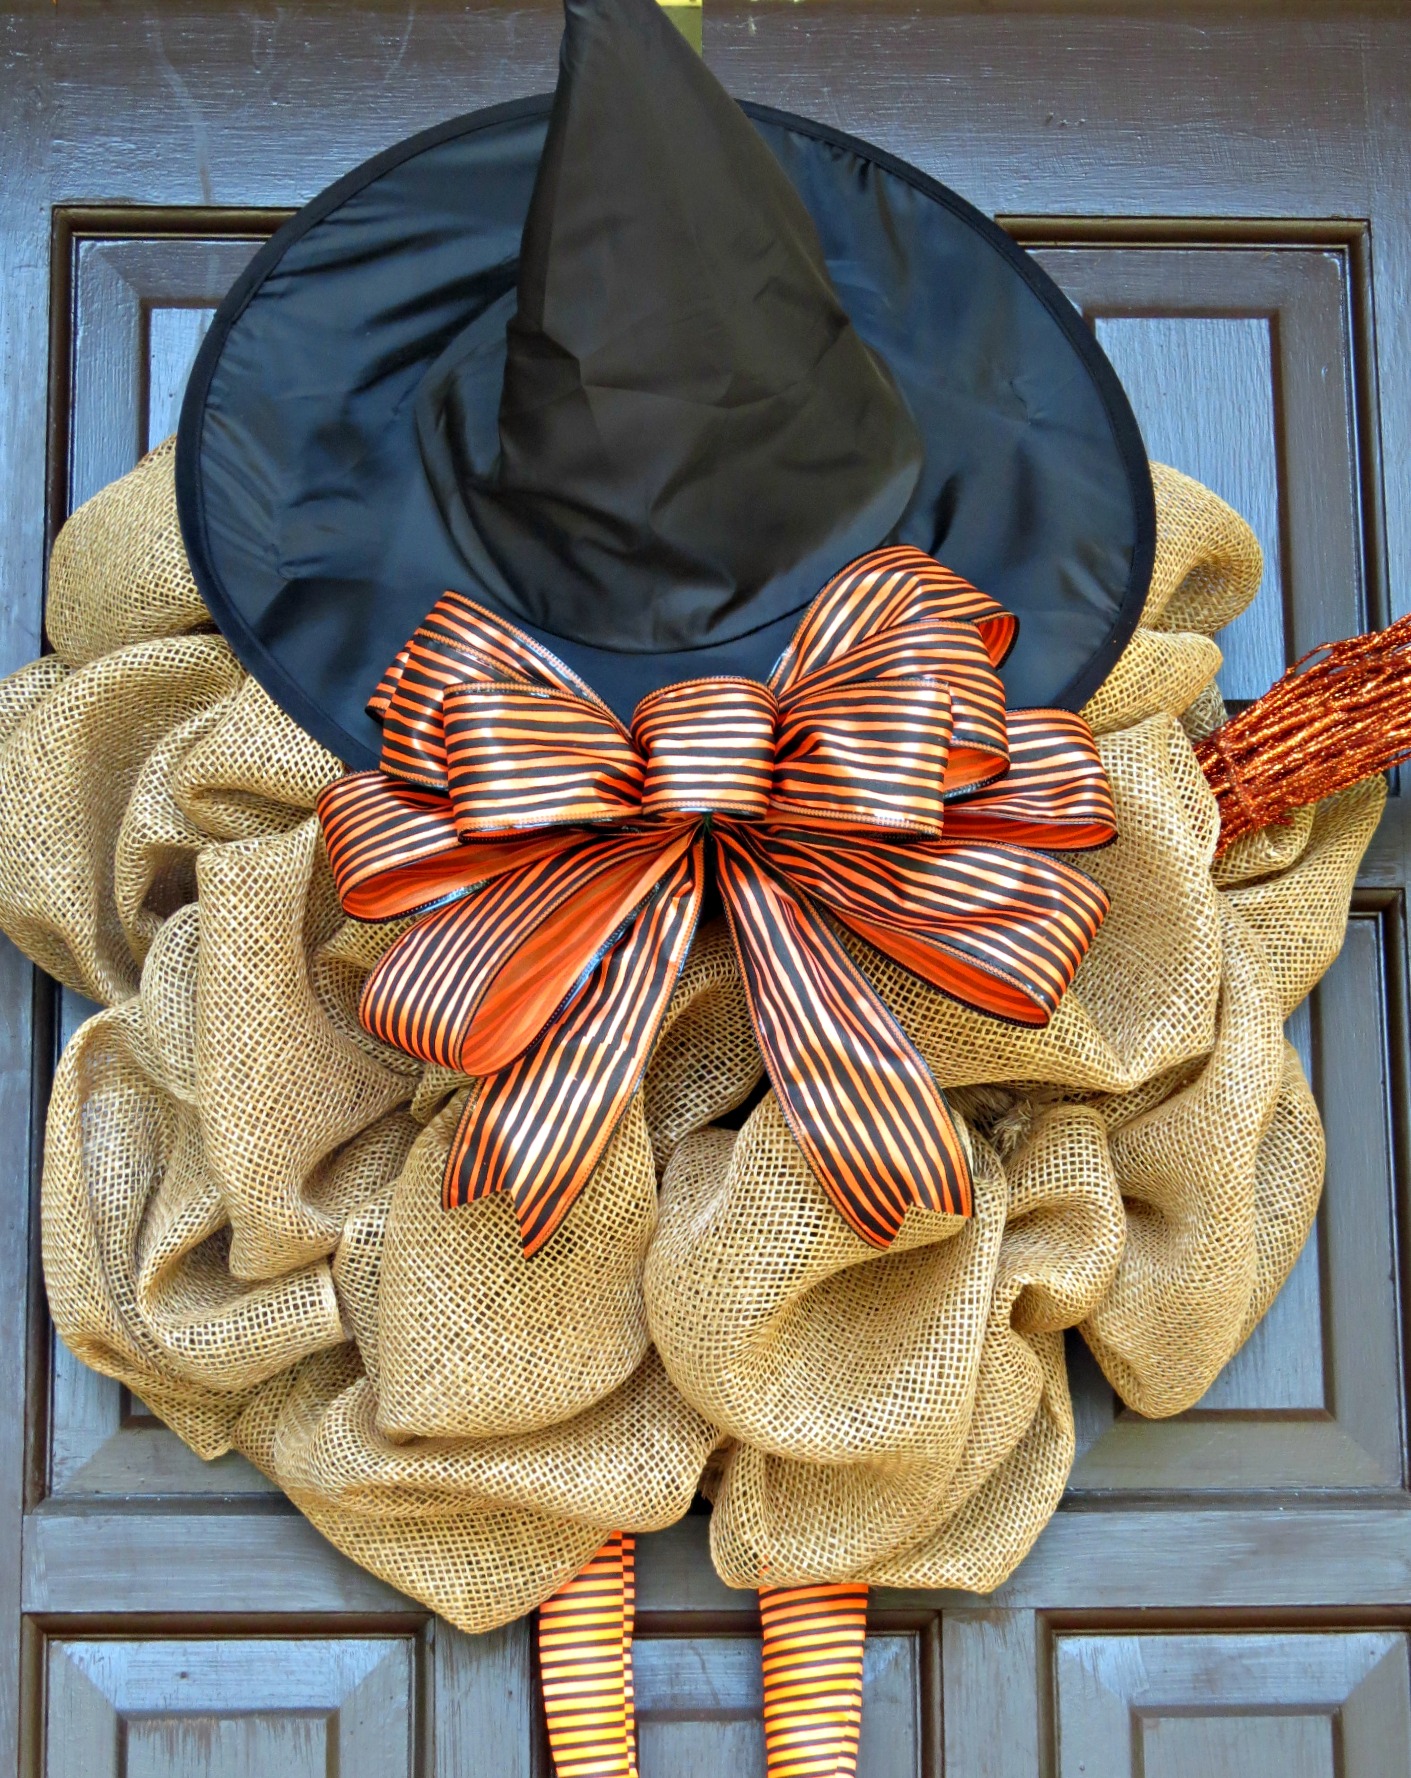
- 1 Roll of Poly Burlap Mesh (21″ x 10 yards)
- 24″ Work Wreath in Burlap Color
- Witch Hat
- Witch Legs
- Broom Stick
- Ribbon (for the bow)
- Floral Wire
- Pro Bow- The Hand Bowmaker (optional)


How to make the base of the Burlap Witch Wreath
Begin by opening up the tinsel ties and making sure they are all standing up straight. Unwrap the mesh roll and pull about 6 inches of mesh off the roll and gather. Starting on the inner ring, place the gathered mesh in the center of a tie and secure it tightly. You can tuck the extra under the wreath frame.
I like to pull about 12-13 inches between each tie and I use a ruler to make sure the puffs are close to the same size. You can do smaller puffs if you don’t want your wreath as fluffy.

 Bunch and fluff your puff before securing it to the next tie. After a few puffs, this is what it will look like.
 Continue this all the way around the inner ring. When the inner ring is complete, you will move to the outer ring.
To move to the outer ring, pull the mesh tight and secure it to the closest tie on the outer ring. Once on the outer ring, you can continue to measure, gather, bunch, fluff and secure.
After the outer ring is complete, your wreath should look something like this, leaving about a six inch tail. {Minus the fuzzy in the bottom left!}
 Flip the wreath over and secure the tail to the metal ring with a zip tie. Once the zip tie is securing the tail, the base of the wreath is finished.


Finishing your Burlap Witch Wreath
This is the first witch wreath I’ve done so I don’t have any pictures of attaching the hat. I wasn’t sure how I was going to do it and was just trying a few different ways. I was home by myself and didn’t have enough hands to attach the hat and take pictures.
My bad.
The witches hat was a very thin nylon so I was able to poke floral wire through it. I started on the bottom of the hat, poked the wire through and than poked it back down from the top of the hat. Since the wire was green, I took a little black craft paint and covered the part you could see on top.
 I did this on the left and right side of the hat and attached the other end of the floral wire to the wreath frame.
The witch legs had little metal hooks on them and I was able to hang them to the bottom ring of my wreath. If you don’t want them to slide around, you can use zip ties to secure them.

You can see that the hat appears to be sitting right on top but it’s secured to the frame. I also took the mesh puffs around the top and shoved them up inside of the hat to get it stand up straight.
Can I be honest for a second? I’m not very good at making bows and most of the time I end up frustrated and saying some not so nice words at who ever is in the room Cory. I bought the Pro-Bow The Hand (bowmaker) thinking it would transform my bow making abilities and I would be able to make all kinds of bows for Christmas last year. Ha!
I tried once, got so mad at it that I gave up and put it back in the box and haven’t touched it until this past week. The Hand does make it much easier but my brain and hands just can’t seem to get it right. Hence why none of my wreaths have bows.
I was dreading the bow on this wreath and after a few failed attempts, some tears, ugly words and mexican for dinner, I got it somewhat right. Heck, it was good enough for me.
No bow is worth the complete meltdown I had.
Ahem.
I digress. Back to the tutorial…
I used a 2.5 inch wired ribbon and my bowmaker to make the bow. Here is the tutorial video for the bow I made. Once I got the bow made, I hot glued it to the front of the witches hat. Make sure not to burn your fingers when pressing the bow onto the hat. The hat was so thin, I used a pot holder to keep my fingers protected.
The broom stick was a little long so I trimmed it down {regular scissors cut it just fine} and located where I wanted the end of it to stick out at. I had to hold the mesh out of the way to allow the broom stick to slide in between the wreath frame and the mesh. Once you have it where you want it, secure it to the frame with zip ties.
And viola! You have a Burlap Witch Wreath.


Hope you enjoyed by Burlap Witch Wreath tutorial. It was super easy to make and I loved how cute it turned out! If you have any questions, feel free to hit me up! Have a good day, y’all!
This post is linked to Inspire Me Please Weekend Blog Hop at House of Rose.
28 Comments
Michelle Casto
Love the bow, and the wreath!!!
Paige @ Reasons to Come Home
Thanks girl!
Trendy Tree
This comment has been removed by the author.
Trendy Tree
Your wreath turned out sooo cute!! And thank you for mentioning us at Trendy Tree….appreciate it!
Paige @ Reasons to Come Home
Thank you! And thanks for always be a great website to work with!
Jeannie Pence
Your Witch Wreath turned out gorgeous….love it))) Thanks for mentioning Trendy tree)))
Paige Sloan
Thank you, Jeannie! Love ordering from you guys!
Dedra Clutz
i LOVE THIS SO MUCH. i LINKED YOUR BLOG AND THIS ADORABLE WREATH IN MY diy HALLOWEEN BLOG POST. I CAN’T WAIT TO EXPLORE THE REST OF YOUR BLOG.
DEDRA
http://dedras-crafts-for-a-cure.blogspot.com/
Paige Sloan
Thanks for stopping by, Dedra!
marie
Love love i think i will try to make one now that my daughter is in college and i feel empty nest
Paige Sloan
So sorry about the empty nest but I hope making this wreath helped!
Christina Marie
WHAT IS THE WIDTH SIZE OF THE MESH ROLL YOU USED. There are options and not sure what size to get.
yOUR WREATH IS SO CUTE!!!
tHANKS FOR THE GREAT INSTRUctions and photos!!
Christina Marie
Sorry, I see now that it’s 21″…. Thanks anyway! and, thanks again for a great tutorial.
Paige Sloan
Glad you found what you are looking for! Thanks for stopping by :)
Stephanie
Super cute wreath! One question…how far apart are the ties on the inner and outer rings? Can’t wait to try this!
Paige Sloan
Thank you, Stephanie! The Work Wreath frames I use measures approximately 15″ with 18 pairs of twists staggered between the two round frames. Hopes this helps!
Jessica Pich
super cute!! Where did you get the witch legs?
Paige Sloan
I either got them from Trendy Tree or MardiGras Outlet. I believe they both have them this year.
Mary kay
Do you know which size you ORDERED?
scrappygail
Your directions are so easy to follow. Thank you for sharing. can’t wait to put this bewitching wreath on my door or maybe on my hallway mirror.
Pingback:
mary Kay
if YOu find out please let me know. I see them on trendy tree But i do not kNow which siZe to order
Sabine
where Did You find the witch legs?
Kathy Risselman
I would pay you if you made one for me. It doesn’t have to be for this year 2015. but I am 70 years young and my hands and fingers can’t do this anymore. please email me. bless you.
Marcia
My sister sent this to me..so i FIGURED she’d like one….it’s the first time working with the mesh….turned out to be super easy and super cute…as it was late in the season I sewed my own witch legs and used a 16″ wreath form….24″ was just too Large….
KAY
I JUST found THIS tutorial. ..SO CUTE! MAYBE IF I start NOW I’LL FINISH IT BY HALLOWEEN :) CAN I ask WHAT YOU USED TO PAINT YOUR DOOR? PLEASE ;)
Pingback:
Pingback: